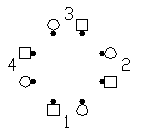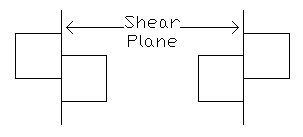
In this paper I will attempt to give you the tools you need to successfully dance the more difficult calls in the C2 Parallelogram and Offset Line/Column concepts. The basis for each of these concepts is that the formation is distorted by having the square effectively cut in half along an imaginary shear (or slip) plane, and each half of the square is slipped, in opposite directions, along that shear plane establishing some offset. The amount of the offset is measured in percent, and is typically 50% or 100%, although offsets of 25% and 75% can exist. To properly execute a call in these concepts involves the following three step process:

Shear plane head wall to head wall

|
|
|
Offset 1
right half of square offset towards number 1 couple position |
Offset 3
right half of square offset towards number 3 couple position |
Shear plane side wall to side wall

|
|
|
Offset 2
front half of square offset towards number 2 couple position |
Offset 4
front half of square offset towards number 4 couple position |
Note that this numbering method always uses the half of the square nearest the caller (or nearest the number 1 couple position) as the reference half of the square if the shear plane is side wall to side wall. The half of the square to the callers right (or nearest the number 2 couple position) is used as the reference if the shear plane is head wall to head wall. By specifying the offset of the reference half of the square, the offset of the other half of the square is automatically in the opposite direction. The offsets are also easy to remember because offsets 1 and 3 have the shear plane running head wall to head wall (we are accustomed to associating numbers 1 and 3 with head couples), and offsets 2 and 4 have a side wall shear plane (2 and 4 remind us of side couples).
I also like this numbering method because I can identify the offset (1,2,3 or 4) and "remember" it by holding that number of fingers up on my hand. I can then execute a very long complex call without worrying about forgetting the offset. I just check my hand at the end of the call and know how to restore the offset!
Note that the diagrams above simply indicate generally that "half of
the square" is offset. I have not indicated whether the half of the
square is a line, a column or a box. It doesn't matter. Each
half of the square is simply a group of 4 dancers. Here are a few
specific examples:
 |
 |
 |
 |
|
| 50% Offset 1
parallelogram lines |
50% Offset 2
parallelogram columns |
50% Offset 3
offset columns |
50% Offset 4
offset lines |
100% Offset 3
offset columns or 100% Offset 4 offset lines |
The last example above deserves mention. The offset direction cannot be determined unless the concept (offset lines or offset columns) is known. The offset percentage is 100% in either case. Let me also mention that I make it a habit to recognize the fact that I am in an offset formation and identify the offset direction as soon as the formation forms. I do not wait until the caller calls a parallelogram or offset line/column concept before trying to identify it. This gives me a little head start. Of course the caller might not use a parallelogram or offset line/column concept. The next call might be triple box or simply "each wave" do something. Also please note that any call done might change the offset. For example, starting from offset 2 parallelogram lines, the call Triple Box Circulate might end up in offset 4 parallelogram lines. So just because you have identified the offset doesn't mean that you don't have to re-evaluate the offset after every call!
Step 2, executing the call, must be done precisely, with the resulting ending formation fully formed, before the offset can be restored. Executing the call without taking out the offset first should be done only for trivial calls where the ending formation is obvious. Caution, some seemingly "simple" calls can be very deceptive when executed in the parallelogram or offset line/column concepts. Only experience will teach you which calls can be executed while keeping the formation offset. When in doubt, remove the offset!
Step 3, restoring the offset, is relatively simple once the call has been executed to completion provided you have used some memory tool to remember the original shear plane and offset direction. When several dancers in the square are attempting to restore the offset in different directions at the same time it can take the square down in a hurry. If you have forgotten the offset, it is better to wait a few seconds to see if someone else remembers it rather than to attempt to restore it incorrectly. As a last resort, check another square on the floor. They might have restored the offset already. But personally I never trust any other square to get it right.
The only disorienting thing about restoring the offset is that you may not end up with the same kind of formation you started with. You might start in parallelogram lines and end up in parallelogram columns, offset lines or offset columns. This happens when the call you executed changes the shape of the formation (such as lines to columns, or lines facing head walls to lines facing side walls).
Here are a few examples of shape changing parallelogram calls:
| Parallelogram Stretch Turn and Deal | |||
 |
 |
 |
|
| Offset 2
Parallelogram lines |
Step 1
Remove the offset |
Step 2
Execute the call |
Step 3
Restore the offset |
| Parallelogram Split Transfer | |||
 |
 |
||
| Offset 4
Parallelogram lines |
Step 1
Remove the offset |
Step 2
Execute the call |
Step 3
Restore the offset |
| Parallelogram Counter Rotate | |||
 |
 |
 |
 |
| Offset 4
Parallelogram lines |
Step 1
Remove the offset |
Step 2
Execute the call |
Step 3
Restore the offset |
As an extreme example, let us look at a parallelogram call nested with
another concept which actually changes the matrix of the set in step 2
(executing the call).
| Parallelogram Triple Box Circulate | |
 |
 |
| 50% Offset 4
Parallelogram lines |
Step 1
Remove the offset |
So far this is easy. But watch what happens in step 2, execute
the call:
 |
| Step 2
Execute the call |
The matrix has now changed from a 2x4 to a 2x6 because of the phantoms
that were added by the Triple Box concept. What do we do with those
phantoms? The answer is: we keep them until the 50% offset 4 is restored.
To offset a 2x6 matrix 50% there must be 3 spots (including phantom
spots) "hanging over" on each side of the set. The result looks like
this:
 |
| Step 3
Restore the offset |
Now the phantoms which are outside the matrix of live dancers may be
eliminated. (Of course any phantoms which are inside the matrix of
live dancers must be kept). The final formation is as follows:
 |
| Step 4?
Eliminate the phantoms |
The result is, you guessed it, a 2x5 matrix. It can get worse. The result can end up a 2x7 or 2x9 matrix depending on the starting formation and offset direction. But breathe easy, you are not likely to see anything like that on a live dance floor any time soon, except maybe at C4.